Writing Templates
You can create your own templates with a small yaml definition which describes the
template and its metadata, along with some input variables that your template
will need, and then a list of actions which are then executed by the scaffolding
service.
Let's take a look at a simple example:
# Notice the v1beta3 version
apiVersion: scaffolder.backstage.io/v1beta3
kind: Template
# some metadata about the template itself
metadata:
  name: v1beta3-demo
  title: Test Action template
  description: scaffolder v1beta3 template demo
spec:
  owner: backstage/techdocs-core
  type: service

  # these are the steps which are rendered in the frontend with the form input
  parameters:
    - title: Fill in some steps
      required:
        - name
      properties:
        name:
          title: Name
          type: string
          description: Unique name of the component
          ui:autofocus: true
          ui:options:
            rows: 5
        owner:
          title: Owner
          type: string
          description: Owner of the component
          ui:field: OwnerPicker
          ui:options:
            catalogFilter:
              kind: Group
    - title: Choose a location
      required:
        - repoUrl
      properties:
        repoUrl:
          title: Repository Location
          type: string
          ui:field: RepoUrlPicker
          ui:options:
            allowedHosts:
              - github.com

  # here's the steps that are executed in series in the scaffolder backend
  steps:
    - id: fetchBase
      name: Fetch Base
      action: fetch:template
      input:
        url: ./template
        values:
          name: ${{ parameters.name }}
          owner: ${{ parameters.owner }}

    - id: fetchDocs
      name: Fetch Docs
      action: fetch:plain
      input:
        targetPath: ./community
        url: https://github.com/backstage/community/tree/main/backstage-community-sessions

    - id: publish
      name: Publish
      action: publish:github
      input:
        description: This is ${{ parameters.name }}
        repoUrl: ${{ parameters.repoUrl }}
        defaultBranch: 'main'

    - id: register
      name: Register
      action: catalog:register
      input:
        repoContentsUrl: ${{ steps.publish.output.repoContentsUrl }}
        catalogInfoPath: '/catalog-info.yaml'

  # some outputs which are saved along with the job for use in the frontend
  output:
    links:
      - title: Repository
        url: ${{ steps['publish'].output.remoteUrl }}
      - title: Open in catalog
        icon: catalog
        entityRef: ${{ steps['register'].output.entityRef }}
Let's dive in and pick apart what each of these sections do and what they are.
spec.parameters - FormStep | FormStep[]
These parameters are template variables which can be modified in the frontend
as a sequence. It can either be one Step if you just want one big list of
different fields in the frontend, or it can be broken up into multiple different
steps which would be rendered as different steps in the scaffolder plugin
frontend.
Each Step is JSONSchema with some extra goodies for styling what it might
look like in the frontend. For these steps we rely very heavily on this
library. They have some
great docs and a
playground where you can
play around with some examples.
There's another option for that library called uiSchema which we've taken
advantage of, and we've merged it with the existing JSONSchema that you
provide to the library. These are the little ui:* properties that you can see
in the step definitions.
For example if we take the simple example from the playground it looks like this:
// jsonSchema:
{
  "title": "A registration form",
  "description": "A simple form example.",
  "type": "object",
  "required": [
    "firstName",
    "lastName"
  ],
  "properties": {
    "firstName": {
      "type": "string",
      "title": "First name",
      "default": "Chuck"
    },
    "lastName": {
      "type": "string",
      "title": "Last name"
    },
    "nicknames":{
      "type": "array",
      "items": {
        "type": "string"
      }
    },
    "telephone": {
      "type": "string",
      "title": "Telephone",
      "minLength": 10
    }
  }
}

// uiSchema:
{
  "firstName": {
    "ui:autofocus": true,
    "ui:emptyValue": "",
    "ui:autocomplete": "given-name"
  },
  "lastName": {
    "ui:emptyValue": "",
    "ui:autocomplete": "family-name"
  },
  "nicknames": {
    "ui:options":{
      "orderable": false
    }
  },
  "telephone": {
    "ui:options": {
      "inputType": "tel"
    }
  }
}
It would look something like the following in a template:
apiVersion: scaffolder.backstage.io/v1beta3
kind: Template
metadata:
  name: v1beta3-demo
  title: Test Action template
  description: scaffolder v1beta3 template demo
spec:
  owner: backstage/techdocs-core
  type: service

  parameters:
    - title: A registration form
      description: A simple form example.
      type: object
      required:
        - firstName
        - lastName
      properties:
        firstName:
          type: string
          title: First name
          default: Chuck
          ui:autofocus: true
          ui:emptyValue: ''
          ui:autocomplete: given-name
        lastName:
          type: string
          title: Last name
          ui:emptyValue: ''
          ui:autocomplete: family-name
        nicknames:
          type: array
          items:
            type: string
          ui:options:
            orderable: false
        telephone:
          type: string
          title: Telephone
          minLength: 10
          ui:options:
            inputType: tel
Using Secrets
You may want to mark things as secret and make sure that these values are protected and not available through REST endpoints. You can do this by using the built in ui:field: Secret.
You can define this property as any normal parameter, however the consumption of this parameter will not be available through ${{ parameters.myKey }} you will instead need to use ${{ secrets.myKey }} in your template.yaml.
Parameters will be automatically masked in the review step.
apiVersion: scaffolder.backstage.io/v1beta3
kind: Template
metadata:
  name: v1beta3-demo
  title: Test Action template
  description: scaffolder v1beta3 template demo
spec:
  owner: backstage/techdocs-core
  type: service

  parameters:
    - title: Authentication
      description: Provide authentication for the resource
      required:
        - username
        - password
      properties:
        username:
          type: string
          # use the built in Secret field extension
          ui:field: Secret
        password:
          type: string
          ui:field: Secret

  steps:
    - id: setupAuthentication
      action: auth:create
      input:
        # make sure to use ${{ secrets.parameterName }} to reference these values
        username: ${{ secrets.username }}
        password: ${{ secrets.password }}
You can also consume secrets within each step of the template.
apiVersion: scaffolder.backstage.io/v1beta3
kind: Template
metadata:
  name: v1beta3-demo
  title: Test Action template
  description: scaffolder v1beta3 template demo
spec:
  owner: backstage/techdocs-core
  type: service

  parameters:
    - title: Authentication
      description: Provide authentication for the resource
      required:
        - service1
        - token1
        - service2
        - token2
      properties:
        service1:
          type: string
        token1:
          type: string
          ui:field: Secret
        service2:
          type: string
        token2:
          type: string
          ui:field: Secret

  steps:
    - id: setupAuthentication
      action: auth:create
      each:
        [
          {
            name: '${{ parameters.service1 }}',
            token: '${{ secrets.token1 }}',
          },
          {
            name: '${{ parameters.service2 }}',
            token: '${{ secrets.token2 }}',
          },
        ]
      input:
        name: ${{ each.value.name }}
        token: ${{ each.value.token }}
Defining a Secrets Schema
You can define a JSON Schema for secrets that will be validated when a task is created. This is useful when secrets are passed programmatically (e.g., via CI/CD pipelines or API calls) rather than through the UI form. The schema ensures that required secrets are provided before task execution begins.
apiVersion: scaffolder.backstage.io/v1beta3
kind: Template
metadata:
  name: publish-to-npm
  title: Publish to NPM
spec:
  owner: backstage/techdocs-core
  type: service

  # Define required secrets with a JSON Schema
  secrets:
    schema:
      required:
        - NPM_TOKEN
      properties:
        NPM_TOKEN:
          type: string
          description: NPM authentication token for publishing

  parameters:
    - title: Package Details
      properties:
        packageName:
          type: string
          title: Package Name

  steps:
    - id: publish
      action: npm:publish
      input:
        packageName: ${{ parameters.packageName }}
        token: ${{ secrets.NPM_TOKEN }}
When a task is created without the required secrets, the API returns a 400 error with a descriptive message:
{
  "errors": [
    {
      "message": "secrets.NPM_TOKEN is required"
    }
  ]
}
Custom step layouts
If you find that the default layout of the form used in a particular step does not meet your needs then you can supply your own custom step layout.
Remove sections or fields based on feature flags
Based on feature flags you can hide sections or even only fields of your template. This is a good use case if you want to test experimental parameters in a production environment. To use it let's look at the following template:
spec:
  type: website
  owner: team-a
  parameters:
    - name: Enter some stuff
      description: Enter some stuff
      backstage:featureFlag: experimental-feature
      properties:
        inputString:
          type: string
          title: string input test
        inputObject:
          type: object
          title: object input test
          description: a little nested thing never hurt anyone right?
          properties:
            first:
              type: string
              title: first
              backstage:featureFlag: nested-experimental-feature
            second:
              type: number
              title: second
If you have a feature flag experimental-feature active then
your first set of parameter fields would be shown. The same goes for the nested properties in the
spec. Make sure to use the key backstage:featureFlag in your templates if
you want to use this functionality.
Feature Flags cannot be used in spec.steps[].if(the conditional on whether to execute a step/action). But you can use feature flags to display parameters that allow for skipping steps.
spec:
  type: website
  owner: team-a
  parameters:
    - name: Enter some stuff
      description: Enter some stuff
      backstage:featureFlag: experimental-feature
      properties:
        skipStep:
          type: boolean
          title: Whether or not to skip a step.
          default: false
        restOfParameters:
          ...
  steps:
    - id: skipMe
      name: A step to skip if the feature flag is turned on and the user selects true
      action: debug:log
      if: ${{ parameters.skipStep }}
      input:
        message: |
        ...
The Repository Picker
In order to make working with repository providers easier, we've built a custom
picker that can be used by overriding the ui:field option in the uiSchema
for a string field. Instead of displaying a text input block it will render
our custom component that we've built which makes it easy to select a repository
provider, and insert a project or owner, and repository name.
You can see it in the above full example which is a separate step and it looks a little like this:
- title: Choose a location
  required:
    - repoUrl
  properties:
    repoUrl:
      title: Repository Location
      type: string
      ui:field: RepoUrlPicker
      ui:options:
        allowedHosts:
          - github.com
The allowedHosts part should be set to where you wish to enable this template
to publish to. And it can be any host that is listed in your integrations
config in app-config.yaml.
Besides specifying allowedHosts you can also restrict the template to publish to
repositories owned by specific users/groups/namespaces by setting the allowedOwners
option. With the allowedRepos option you are able to narrow it down further to a
specific set of repository names. A full example could look like this:
- title: Choose a location
  required:
    - repoUrl
  properties:
    repoUrl:
      title: Repository Location
      type: string
      ui:field: RepoUrlPicker
      ui:options:
        allowedHosts:
          - github.com
        allowedOwners:
          - backstage
          - someGithubUser
        allowedRepos:
          - backstage
For a list of all possible ui:options input props for RepoUrlPicker, please visit here.
The RepoUrlPicker is a custom field that we provide part of the
plugin-scaffolder. You can provide your own custom fields by
writing your own Custom Field Extensions
Using the Users oauth token
There's a little bit of extra magic that you get out of the box when using the
RepoUrlPicker as a field input. You can provide some additional options under
ui:options to allow the RepoUrlPicker to grab an oauth token for the user
for the required repository.
This is great for when you are wanting to create a new repository, or wanting to perform operations on top of an existing repository.
A sample template that takes advantage of this is like so:
apiVersion: scaffolder.backstage.io/v1beta3
kind: Template
metadata:
  name: v1beta3-demo
  title: Test Action template
  description: scaffolder v1beta3 template demo
spec:
  owner: backstage/techdocs-core
  type: service

  parameters:
    ...

    - title: Choose a location
      required:
        - repoUrl
      properties:
        repoUrl:
          title: Repository Location
          type: string
          ui:field: RepoUrlPicker
          ui:options:
            # Here's the option you can pass to the RepoUrlPicker
            requestUserCredentials:
              secretsKey: USER_OAUTH_TOKEN
              additionalScopes:
                github:
                  - workflow
            allowedHosts:
              - github.com
    ...

  steps:
    ...

    - id: publish
      name: Publish
      action: publish:github
      input:
        description: This is ${{ parameters.name }}
        repoUrl: ${{ parameters.repoUrl }}
        # here's where the secret can be used
        token: ${{ secrets.USER_OAUTH_TOKEN }}

    ...
You will see from above that there is an additional requestUserCredentials
object that is passed to the RepoUrlPicker. This object defines what the
returned secret should be stored as when accessing using
${{ secrets.secretName }}, in this case it is USER_OAUTH_TOKEN. And then you
will see that there is an additional input field into the publish:github
action called token, in which you can use the secret like so:
token: ${{ secrets.USER_OAUTH_TOKEN }}.
There's also the ability to pass additional scopes when requesting the oauth
token from the user, which you can do on a per-provider basis, in case your
template can be published to multiple providers.
Note, that you will need to configure an authentication provider, alongside the
ScmAuthApi for your source code management (SCM) service to make this feature work.
The Repository Branch Picker
Similar to the repository picker, there is a picker for branches to support autocompletion. A full example could look like this:
- title: Choose a branch
  required:
    - repoBranch
  properties:
    repoBranch:
      title: Repository Branch
      type: string
      ui:field: RepoBranchPicker
      ui:options:
        requestUserCredentials:
          secretsKey: USER_OAUTH_TOKEN
Passing the requestUserCredentials object is required for autocompletion to work.
If you're also using the repository picker, you should simply duplicate this part from there.
For more information regarding the requestUserCredentials object, please refer to the Using the Users oauth token section under The Repository Picker.
For a list of all possible ui:options input props for RepoBranchPicker, please visit here.
The RepoBranchPicker is a custom field that we provide part of the
plugin-scaffolder. You can provide your own custom fields by
writing your own Custom Field Extensions
The Repository Owner Picker
Similar to the repository picker, there is a picker for owners to support autocompletion. A full example could look like this:
- title: Choose an owner
  required:
    - repoOwner
  properties:
    repoOwner:
      title: Repository Owner
      type: string
      ui:field: RepoOwnerPicker
      ui:options:
        host: github.com
        excludedOwners:
          - backstage
        requestUserCredentials:
          secretsKey: USER_OAUTH_TOKEN
Passing the requestUserCredentials and host properties is required for autocompletion to work. For more information regarding the requestUserCredentials object, please refer to the Using the Users oauth token section under The Repository Picker.
For a list of all possible ui:options input props for RepoOwnerPicker, please visit here.
The RepoOwnerPicker is a custom field that we provide part of the
plugin-scaffolder. You can provide your own custom fields by
writing your own Custom Field Extensions
Accessing the signed-in users details
Sometimes when authoring templates, you'll want to access the user that is running the template, and get details from the profile or the users Entity in the Catalog.
If you have enabled a sign in provider and have a sign in resolver that points to a user in the Catalog, then you can use the ${{ user.entity }} templating expression to access the raw entity from the Catalog.
This can be particularly useful if you have processors setup in the Catalog to write spec.profile.email of the User Entities to reference them and pass them into actions like below:
  steps:
    action: publish:github
    ...
    input:
        ...
        gitAuthorName: ${{ user.entity.metadata.name }}
        gitAuthorEmail: ${{ user.entity.spec.profile.email }}
You also have access to user.entity.metadata.annotations too, so if you have some other additional information stored in there, you reference those too.
The Owner Picker
When the scaffolder needs to add new components to the catalog, it needs to have
an owner for them. Ideally, users should be able to select an owner when they go
through the scaffolder form from the users and groups already known to
Backstage. The OwnerPicker is a custom field that generates a searchable list
of groups and/or users already in the catalog to pick an owner from. You can
specify which of the two kinds (or both) are listed in the catalogFilter.kind option:
owner:
  title: Owner
  type: string
  description: Owner of the component
  ui:field: OwnerPicker
  ui:options:
    catalogFilter:
      kind: [Group, User]
For a list of all possible ui:options input props for OwnerPicker, please visit here.
catalogFilter
The catalogFilter allow you to filter the list entities using any of the catalog api filters:
For example, if you want to show users in the default namespace, and groups with the github.com/team-slug annotation, you can do the following:
catalogFilter:
  - kind: [User]
    metadata.namespace: default
  - kind: [Group]
    metadata.annotations.github.com/team-slug: { exists: true }
Custom validation messages
You may specify custom JSON Schema validation messages as supported by the ajv-errors plugin library to ajv.
spec.steps - Action[]
The steps is an array of the things that you want to happen part of this
template. These follow the same standard format:
- id: fetchBase # A unique id for the step
  name: Fetch Base # A title displayed in the frontend
  if: ${{ parameters.name }} # Optional condition, skip the step if not truthy
  each: ${{ parameters.iterable }} # Optional iterable, run the same step multiple times
  action: fetch:template # An action to call
  input: # Input that is passed as arguments to the action handler
    url: ./template
    values:
      name: ${{ parameters.name }}
When using custom actions, use camelCase for action IDs to avoid issues with template expressions. Action IDs with dashes will cause expressions like ${{ steps.my-action.output.value }} to return NaN instead of the expected value.
Use myAction instead of my-action, or access outputs with bracket notation: ${{ steps['my-action'].output.value }}.
By default we ship some built in actions that you can take a look at, or you can create your own custom actions.
When each is provided, the current iteration value is available in the ${{ each }} input.
Examples:
each: ['apples', 'oranges']
input:
  values:
    fruit: ${{ each.value }}
each: [{ name: 'apple', count: 3 }, { name: 'orange', count: 1 }]
input:
  values:
    fruit: ${{ each.value.name }}
    count: ${{ each.value.count }}
When each is used, the outputs of a repeated step are returned as an array of outputs from each iteration.
Status Check Functions - always() and failure()
By default, when a step fails during a scaffolder run, all subsequent steps are skipped and the task is marked as failed. This can be problematic when your template creates external resources (repositories, cloud infrastructure, deployments) that need to be cleaned up if a later step fails.
Status check functions give you control over which steps run even after a failure. You use them inside a ${{ ... }} template expression in the if field of a step.
| Function | Description |
|---|---|
always() | Always runs the step, regardless of whether previous steps passed or failed. |
failure() | Runs the step only when a previous step has failed. |
These functions must be used as template expressions such as ${{ always() }} or ${{ failure() }}.
After a step has failed, the scaffolder only attempts later steps whose if expression invokes one of these status check functions.
Usage
steps:
  - id: cleanup
    name: Cleanup Resources
    action: my:cleanup:action
    if: ${{ always() }}
Example: Cleanup on failure
A common pattern is to create resources in early steps and add cleanup steps that only run if something goes wrong:
steps:
  - id: create-repo
    name: Create Repository
    action: publish:github
    input:
      repoUrl: ${{ parameters.repoUrl }}

  - id: deploy
    name: Deploy to Kubernetes
    action: deploy:kubernetes
    input:
      manifest: ./k8s/deployment.yaml

  # Only runs when a previous step failed — cleans up the repository
  - id: cleanup-repo
    name: Delete Repository
    action: github:repo:delete
    if: ${{ failure() }}
    input:
      repoUrl: ${{ parameters.repoUrl }}

  # Always runs — post an audit event regardless of outcome
  - id: audit
    name: Post Audit Event
    action: debug:log
    if: ${{ always() }}
    input:
      message: 'Scaffolder run completed for ${{ parameters.repoUrl }}'

  # Does not run after a failure, because it does not invoke a status check function
  - id: plain-truthy-condition
    name: Plain Truthy Condition
    action: debug:log
    if: ${{ true }}
    input:
      message: 'This step is skipped after a previous failure'
Outputs
Each individual step can output some variables that can be used in the scaffolder frontend for after the job is finished. This is useful for things like linking to the entity that has been created with the backend, linking to the created repository, or showing Markdown text blobs.
output:
  links:
    - title: Repository
      url: ${{ steps['publish'].output.remoteUrl }} # link to the remote repository
    - title: Open in catalog
      icon: catalog
      entityRef: ${{ steps['register'].output.entityRef }} # link to the entity that has been ingested to the catalog
  text:
    - title: More information
      content: |
        **Entity URL:** `${{ steps['publish'].output.remoteUrl }}`
Output links and text items support an optional if condition, using the same syntax as step conditions. Items where the condition evaluates to false are excluded from the output:
output:
  links:
    - title: Repository
      url: ${{ steps['publish'].output.remoteUrl }}
    - if: ${{ parameters.enableCI === "Yes" }}
      title: CI Dashboard
      url: https://ci.example.com/${{ parameters.name }}
  text:
    - title: Summary
      content: |
        **Component:** `${{ parameters.name }}`
    - if: ${{ parameters.showDetails }}
      title: Details
      content: |
        **CI enabled:** ${{ parameters.enableCI }}
The templating syntax
You might have noticed expressions wrapped in ${{ }} in the examples. These are
template strings for linking and gluing the different parts of the template
together. All the form inputs from the parameters section will be available by
using this template syntax (for example, ${{ parameters.firstName }} inserts
the value of firstName from the parameters). This is great for passing the
values from the form into different steps and reusing these input variables.
These template strings preserve the type of the parameter.
The ${{ parameters.firstName }} pattern will work only in the template file.
If you want to start using values provided from the UI in your code, you will have to use
the ${{ values.firstName }} pattern. Additionally, you have to pass
the parameters from the UI to the input of the fetch:template step.
apiVersion: scaffolder.backstage.io/v1beta3
kind: Template
metadata:
  name: v1beta3-demo
  title: Test Action
  description: scaffolder v1beta3 template demo
spec:
  owner: backstage/techdocs-core
  type: service
  parameters:
    - title: Fill in some steps
      required:
        - name
      properties:
        name:
          title: Name
          type: string
          description: Unique name of your project
        urlParameter:
          title: URL endpoint
          type: string
          description: URL endpoint at which the component can be reached
          default: 'https://www.example.com'
        enabledDB:
          title: Enable Database
          type: boolean
          default: false
  ...
  steps:
    - id: fetchBase
      name: Fetch Base
      action: fetch:template
      input:
        url: ./template
        values:
          name: ${{ parameters.name }}
          url: ${{ parameters.urlParameter }}
          enabledDB: ${{ parameters.enabledDB }}
Afterwards, if you are using the builtin templating action, you can start using the variables in your code. You can use also any other templating functions from Nunjucks as well.
#!/bin/bash
echo "Hi my name is ${{ values.name }}, and you can fine me at ${{ values.url }}!"
{% if values.enabledDB %}
echo "You have enabled your database!"
{% endif %}
As you can see above in the Outputs section, actions and steps can also
output things. You can grab that output using steps.$stepId.output.$property.
You can read more about all the inputs and outputs defined in the actions in
code part of the JSONSchema, or you can read more about our
built in actions.
More about expressions
The ${{ }} constructs in your template are evaluated using the
powerful Nunjucks templating engine.
To learn more about basic Nunjucks templating please see
templating documentation.
Information about Backstage's built-in templating extensions, as well as how to create your own customizations, may be found at Templating Extensions.
Template Editor
Writing template is most of the times an iterative process. You will need to test your template to make sure it has a good user experience and that it works as expected. To help on this process the scaffolder comes with a build in template editor that allows you to test your template in a real environment for querying data and execute the actions on dry-run mode to see the results of those one.
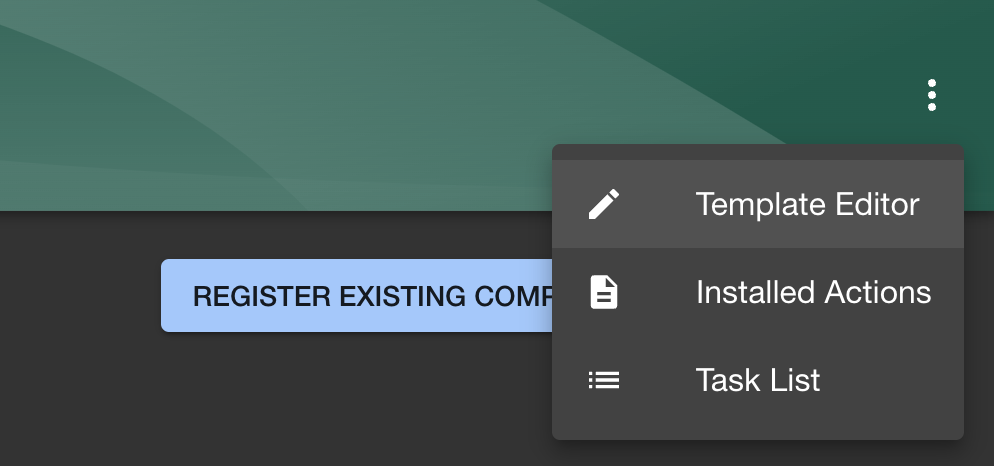
To access to the template editor you can go to the templates page and select "Template Editor" from the context menu or navigate to the {scaffolder-path}/edit url. (i.e. the default route would be /create/edit)
The template editor has 3 main sections:
- Load Template Directory: Load a local template directory, allowing you to both edit and try executing your own template.
- Edit Template Form: Preview and edit a template form, either using a sample template or by loading a template from the catalog.
- Custom Field Explorer: View and play around with available installed custom field extensions.
Load Template Directory
Allow to load a directory on your local file system that contains a template and editing the files in it while previewing the form and executing the template.
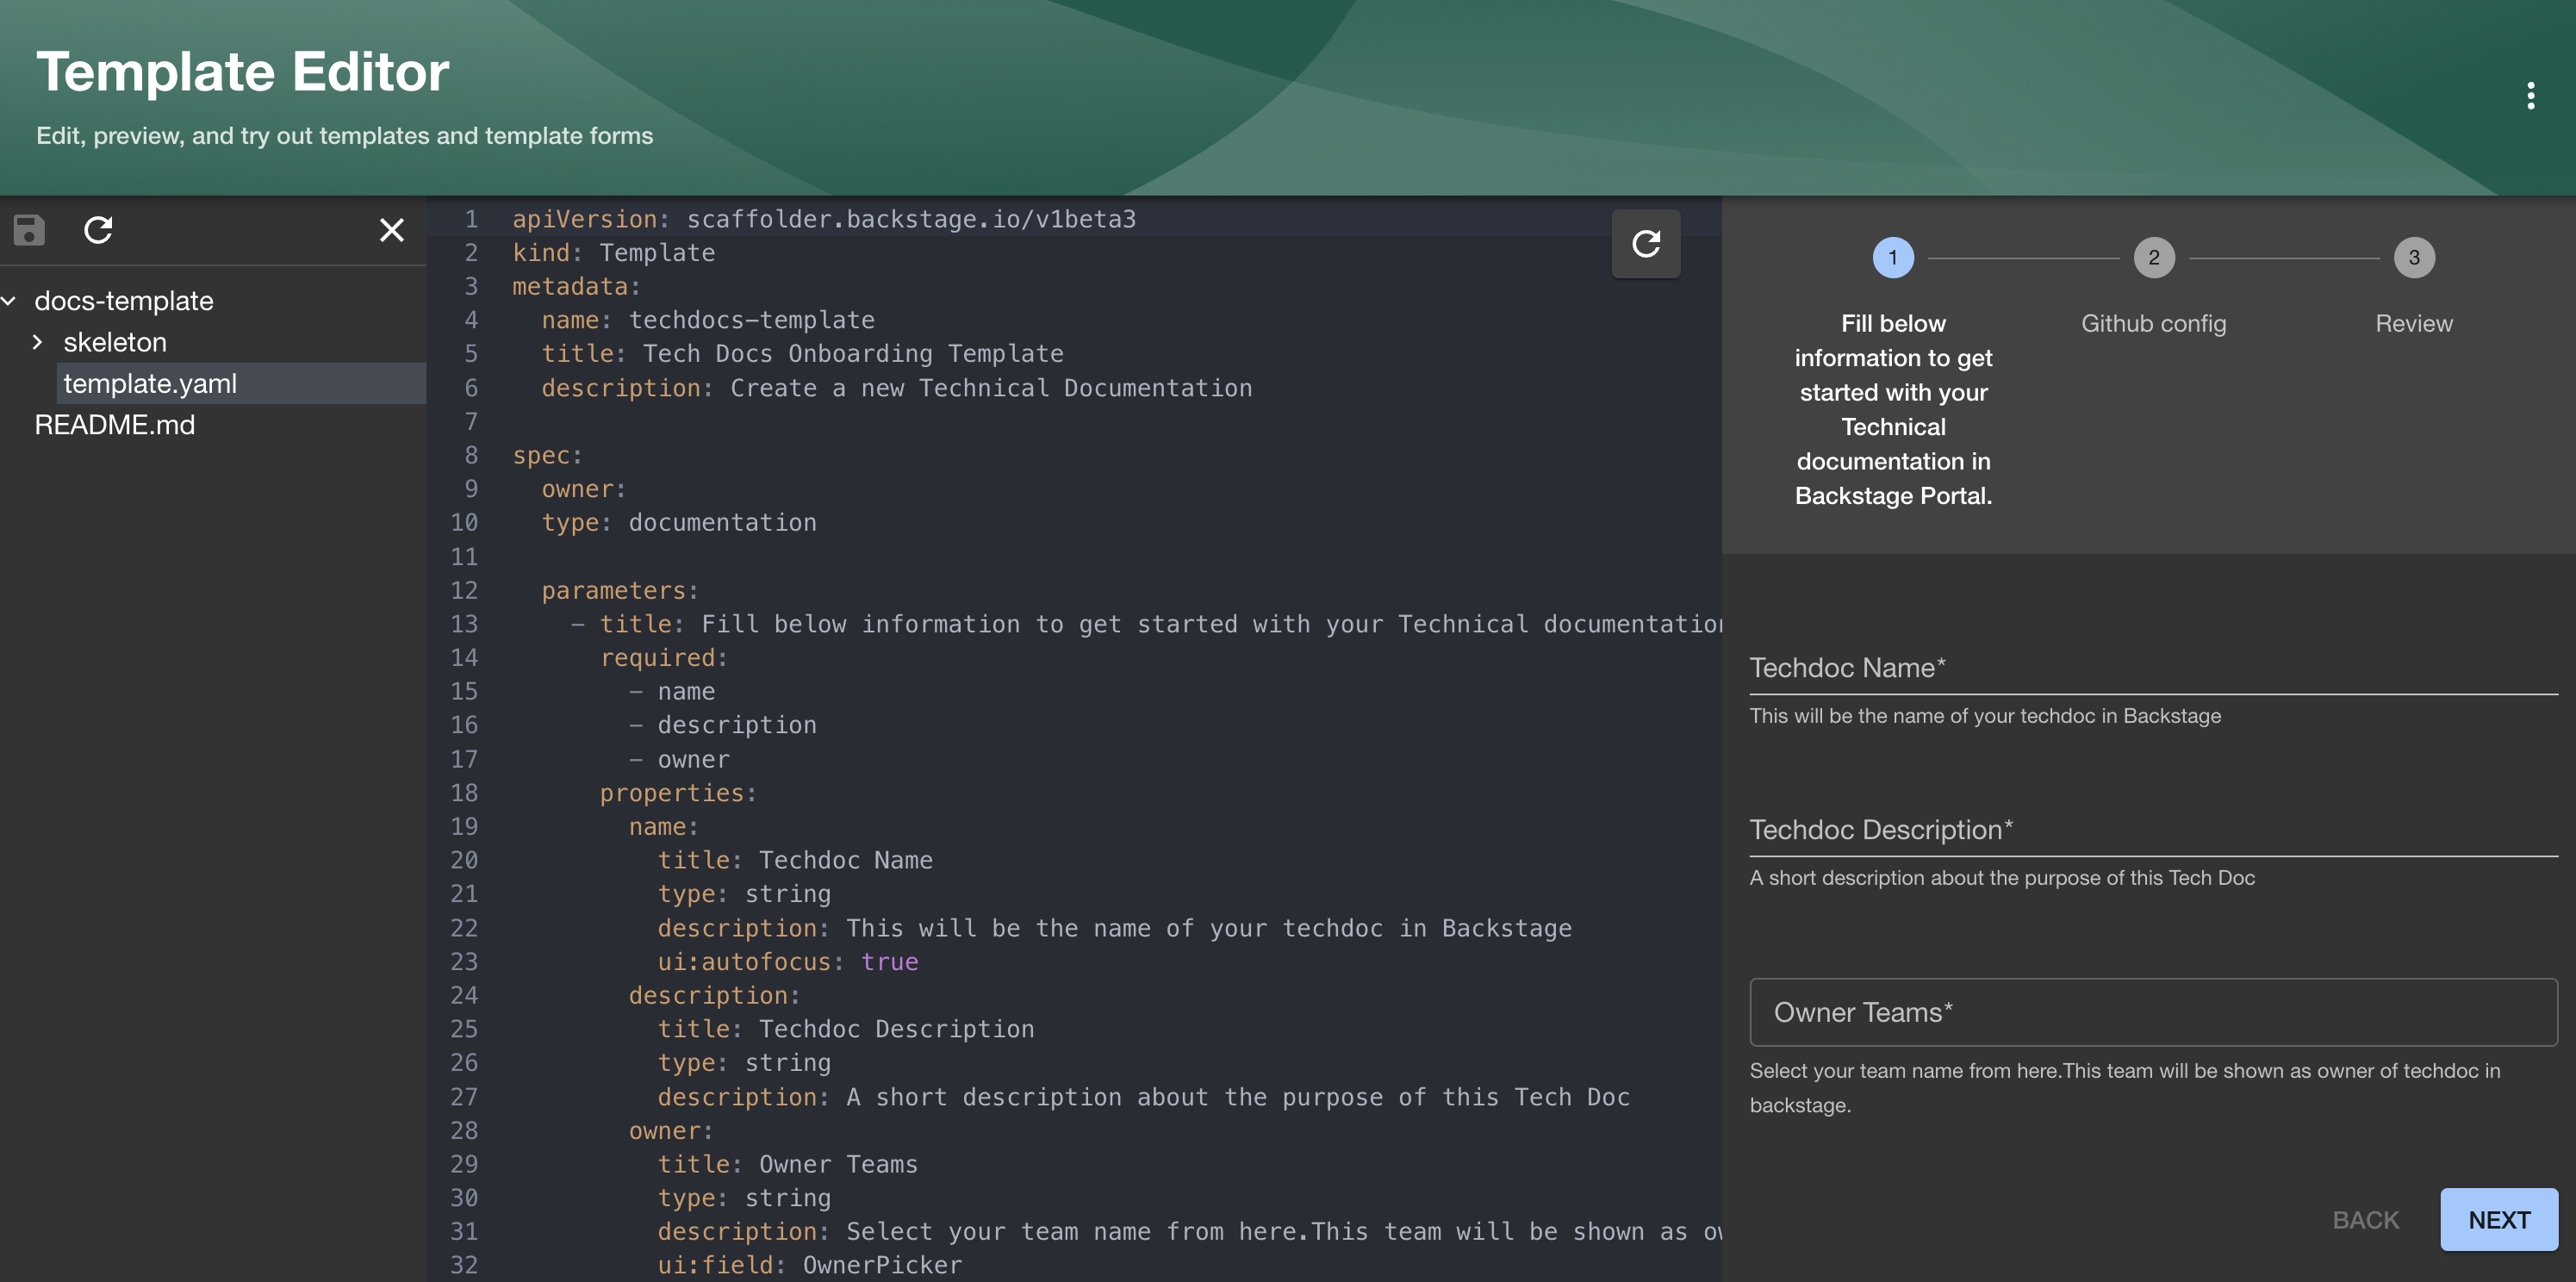
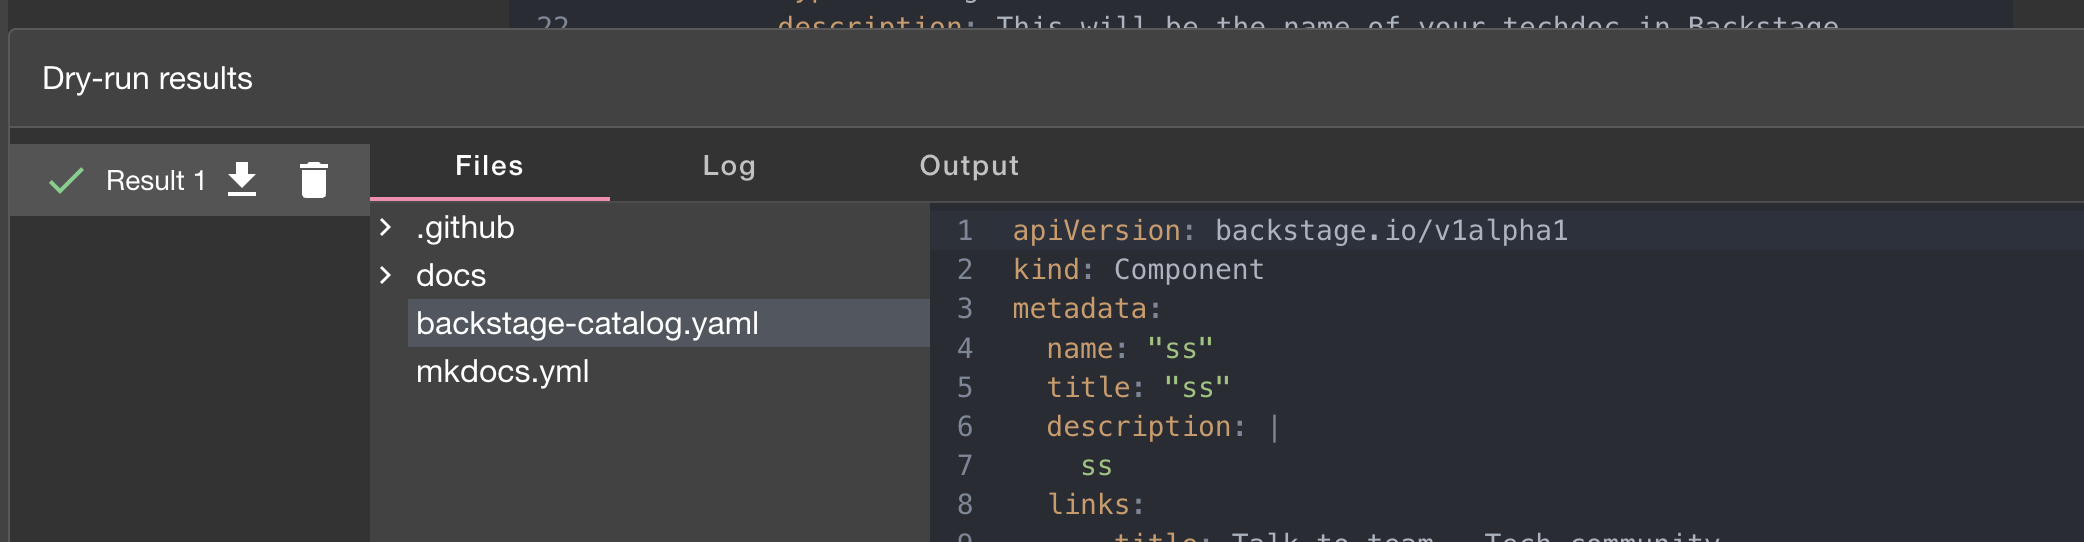
If you complete the form in the right side and click on Create button, the template will be executed in dry-run mode and the result will be shown in the Dry-run result drawer that will pop-up at the bottom of the screen.
Here we could find all the file system results of the template execution as well as the logs of each action that was executed.
Edit Template Form
This is a reduced version of the template editor that allows you to select any template from the catalog and do some modifications on the form presented to the user to test some changes.
Have in mind that changes in this form will not be saved on the template and is meant to test out changes to replicate them manually on the template file after.
Custom Field Explorer
The custom field explorer allows you to select any custom field loaded on the backstage instance and test different values and configurations.
Presentation
You can configure the text of the "Back", "Review", and "Create" buttons using the spec.presentation field of your Software Template. You might want have a Template that doesn't "Create" something but rather "Updates" it. This feature will allow you to change it as needed. Here's an example of how to use this:
---
spec:
  owner: scaffolder/maintainers
  type: website
  presentation:
    buttonLabels:
      backButtonText: 'Return'
      createButtonText: 'Update'
      reviewButtonText: 'Verify'