Getting Started
TechDocs functions as a plugin in Backstage and ships with it installed out of the box, so you will need to use Backstage to use TechDocs.
If you haven't setup Backstage already, start here.
Adding TechDocs frontend plugin
The first step is to add the TechDocs plugin to your Backstage application.
Navigate to your new Backstage application directory. And then to your
packages/app directory, and install the @backstage/plugin-techdocs package.
yarn --cwd packages/app add @backstage/plugin-techdocs
Once the package has been installed, you need to import the plugin in your app.
In packages/app/src/App.tsx, import TechDocsPage and add the following to
FlatRoutes:
import {
  DefaultTechDocsHome,
  TechDocsIndexPage,
  TechDocsReaderPage,
} from '@backstage/plugin-techdocs';

const AppRoutes = () => {
  <FlatRoutes>
    {/* ... other plugin routes */}
    <Route path="/docs" element={<TechDocsIndexPage />}>
      <DefaultTechDocsHome />
    </Route>
    <Route
      path="/docs/:namespace/:kind/:name/*"
      element={<TechDocsReaderPage />}
    />
  </FlatRoutes>;
};
It would be nice to decorate your pages with something else... Having a link that redirects you to a new issue page when you highlight text in your documentation would be really cool, right? Let's learn how to do this using the TechDocs Addon Framework!
With the TechDocs Addon framework, you can render React components in documentation pages and these Addons can be provided by any Backstage plugin. The framework is exported by the @backstage/plugin-techdocs-react package and there is a <ReportIssue /> Addon in the @backstage/plugin-techdocs-module-addons-contrib package for you to use once you have these two dependencies installed:
import {
  DefaultTechDocsHome,
  TechDocsIndexPage,
  TechDocsReaderPage,
} from '@backstage/plugin-techdocs';
import { TechDocsAddons } from '@backstage/plugin-techdocs-react';
import { ReportIssue } from '@backstage/plugin-techdocs-module-addons-contrib';

const AppRoutes = () => {
  <FlatRoutes>
    {/* ... other plugin routes */}
    <Route path="/docs" element={<TechDocsIndexPage />}>
      <DefaultTechDocsHome />
    </Route>
    <Route
      path="/docs/:namespace/:kind/:name/*"
      element={<TechDocsReaderPage />}
    >
      <TechDocsAddons>
        <ReportIssue />
      </TechDocsAddons>
    </Route>
  </FlatRoutes>;
};
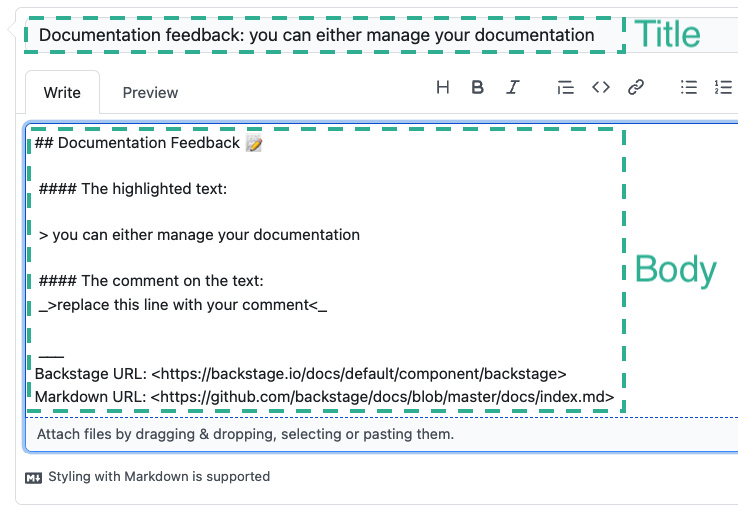
I know, you're curious to see how it looks, aren't you? See the image below:

By clicking the open new issue button, you will be redirected to the new issue page according to the source code provider you are using:

That's it! Now, we need the TechDocs Backend plugin for the frontend to work.
Adding TechDocs Backend plugin
These instructions are for the new backend system. For setting this up in the old backend system, see here
First we need to install the @backstage/plugin-techdocs-backend package.
yarn --cwd packages/backend add @backstage/plugin-techdocs-backend
Then in your backend index.ts you will add the following line.
const backend = createBackend();

// Other plugins...

backend.add(import('@backstage/plugin-techdocs-backend'));

backend.start();
That's it! TechDocs frontend and backend have now been added to your Backstage app. Now let us tweak some configurations to suit your needs.
Setting the configuration
See TechDocs Configuration Options for complete configuration reference.
Should TechDocs Backend generate docs?
techdocs:
  builder: 'local'
Note that we recommend generating docs on CI/CD instead. Read more in the
"Basic" and "Recommended" sections of the
TechDocs Architecture. But if you want to get started quickly
set techdocs.builder to 'local' so that TechDocs Backend is responsible for
generating documentation sites. If set to 'external', Backstage will assume
that the sites are being generated on each entity's CI/CD pipeline, and are
being stored in a storage somewhere.
When techdocs.builder is set to 'external', TechDocs becomes more or less a
read-only experience where it serves static files from a storage containing all
the generated documentation.
Choosing storage (publisher)
TechDocs needs to know where to store generated documentation sites and where to fetch the sites from. This is managed by a Publisher. Examples: Google Cloud Storage, Amazon S3, or local filesystem of Backstage server.
It is okay to use the local filesystem in a "basic" setup when you are trying out Backstage for the first time. At a later time, review Using Cloud Storage.
techdocs:
  builder: 'local'
  publisher:
    type: 'local'
Disabling Docker in Docker situation (Optional)
You can skip this if your techdocs.builder is set to 'external'.
The TechDocs Backend plugin runs a docker container with mkdocs installed to generate the frontend of the docs from source files (Markdown). If you are deploying Backstage using Docker, this will mean that your Backstage Docker container will try to run another Docker container for TechDocs Backend.
To avoid this problem, we have a configuration available. You can set a value in
your app-config.yaml that tells the techdocs generator if it should run the
local mkdocs or run it from docker. This defaults to running as docker if
no config is provided.
techdocs:
  builder: 'local'
  publisher:
    type: 'local'
  generator:
    runIn: local
Setting generator.runIn to local means you will have to make sure your
environment is compatible with techdocs.
You will have to install the mkdocs and mkdocs-techdocs-core package from
pip, optionally also graphviz and plantuml from your OS package manager (e.g.
apt).
You can do so by including the following lines right above USER node of your
Dockerfile:
RUN apt-get update && \
    apt-get install -y python3 python3-pip python3-venv && \
    rm -rf /var/lib/apt/lists/*

ENV VIRTUAL_ENV=/opt/venv
RUN python3 -m venv $VIRTUAL_ENV
ENV PATH="$VIRTUAL_ENV/bin:$PATH"

RUN pip3 install mkdocs-techdocs-core
Please be aware that the version requirement could change, you need to check our
Dockerfile
and make sure to match with it.
On a Debian-based Docker container, Python packages must be either installed using the OS package manager or within a virtual environment (see the related PEP). Alternative is to use e.g. pipx for installing Python packages in an isolated environment.
The above Dockerfile snippet installs the latest mkdocs-techdoc-core package.
Version numbers can be found in the corresponding
changelog. In
case you want to pin the version, use the example below:
RUN pip3 install mkdocs-techdocs-core==1.2.3
Note: We recommend Python version 3.11 or higher.
Caveat: Please install the
mkdocs-techdocs-corepackage after all other Python packages. The order is important to make sure we get correct version of some of the dependencies.