Authentication
This documentation is written for the new frontend system. If you are on the old frontend system you may want to read its own article instead.
Audience: Admins or Developers
Summary
We'll be walking you through how to setup authentication for your Backstage app using GitHub. After finishing this guide, you'll have both working authentication and users in your Backstage app to match to the users logging in!
There are multiple authentication providers available for you to use with Backstage, feel free to follow their instructions for adding authentication.
The default Backstage app comes with a guest Sign In Resolver. This resolver makes all users share a single "guest" identity and is only intended as a minimum requirement to quickly get up and running. You can read more about how Sign In Resolvers play a role in creating a Backstage User Identity for logged in users.
Setting up authentication
For this tutorial we choose to use GitHub, a free service most of you might be familiar with, and we'll be using an OAuth app. For detailed options, see the GitHub auth provider documentation.
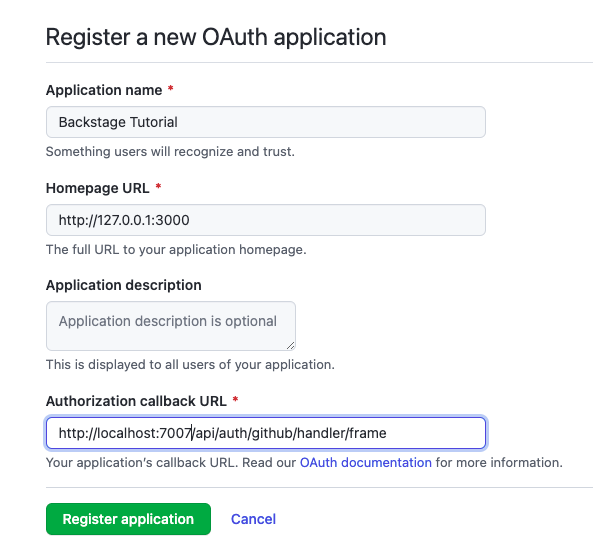
Go to https://github.com/settings/applications/new to create your OAuth App. The "Homepage URL" should point to Backstage's frontend, in our tutorial it would be http://localhost:3000. The "Authorization callback URL" will point to the auth backend, which will most likely be http://localhost:7007/api/auth/github/handler/frame.
Take note of the Client ID and the Client Secret (clicking the "Generate a new client secret" button will get this value for you). Open app-config.yaml, and add them as clientId and clientSecret in this file. It should end up looking like this:
auth:
  # see https://backstage.io/docs/auth/ to learn about auth providers
  environment: development
  providers:
    # See https://backstage.io/docs/auth/guest/provider
    guest: {}
    github:
      development:
        clientId: YOUR CLIENT ID
        clientSecret: YOUR CLIENT SECRET
Add sign-in option to the frontend
The next step is to change the sign-in page. For this, you'll actually need to write some code.
First let's add the packages we need, do this from the root:
yarn --cwd packages/app add @backstage/core-plugin-api @backstage/plugin-app-react
Then open packages/app/src/App.tsx and below the last import line, add:
import { githubAuthApiRef } from '@backstage/core-plugin-api';
import { SignInPageBlueprint } from '@backstage/plugin-app-react';
import { SignInPage } from '@backstage/core-components';
import { createFrontendModule } from '@backstage/frontend-plugin-api';
Now below this we are going to use the SignInPageBlueprint to create an extension, add this code block to do that:
const signInPage = SignInPageBlueprint.make({
  params: {
    loader: async () => props =>
      (
        <SignInPage
          {...props}
          provider={{
            id: 'github-auth-provider',
            title: 'GitHub',
            message: 'Sign in using GitHub',
            apiRef: githubAuthApiRef,
          }}
        />
      ),
  },
});
Search for the createApp() function call in this file, and replace:
export default createApp({
  features: [catalogPlugin, navModule],
});
with
export default createApp({
  features: [
    catalogPlugin,
    navModule,
    createFrontendModule({
      pluginId: 'app',
      extensions: [signInPage],
    }),
  ],
});
Add sign-in resolver(s)
Next we need to add the sign-in resolver to our configuration. Here's how:
auth:
  # see https://backstage.io/docs/auth/ to learn about auth providers
  environment: development
  providers:
    # See https://backstage.io/docs/auth/guest/provider
    guest: {}
    github:
      development:
        clientId: YOUR CLIENT ID
        clientSecret: YOUR CLIENT SECRET
        signIn:
          resolvers:
            # Matches the GitHub username with the Backstage user entity name.
            # See https://backstage.io/docs/auth/github/provider#resolvers for more resolvers.
            - resolver: usernameMatchingUserEntityName
What this will do is take the user details provided by the auth provider and match that against a User in the Catalog. In this case - usernameMatchingUserEntityName - will match the GitHub user name with the metadata.name value of a User in the Catalog, if none is found you will get a "Failed to sign-in, unable to resolve user identity" message. We'll cover this in the next few sections.
Learn more about this topic in the Sign-in Resolvers documentation.
Add the auth provider to the backend
To add the auth provider to the backend, we will first need to install the package by running this command:
yarn --cwd packages/backend add @backstage/plugin-auth-backend-module-github-provider
Then we will need to add this line:
backend.add(import('@backstage/plugin-auth-backend'));
backend.add(import('@backstage/plugin-auth-backend-module-github-provider'));
Restart Backstage from the terminal, by stopping it with Ctrl+C, and starting it with yarn start. You should be welcomed by a login prompt! If you try to login at this point you will get a "Failed to sign-in, unable to resolve user identity" message, read on as we'll fix that next.
Sometimes the frontend starts before the backend resulting in errors on the sign in page. Wait for the backend to start and then reload Backstage to proceed.
Adding a User
The recommended approach for adding Users, and Groups, into your Catalog is to use one of the existing Org Entity Providers - like this one for GitHub - or if those don't work you may need to create one that fits your Organization's needs.
For the sake of this guide we'll simply step you through adding a User to the org.yaml file that is included when you create a new Backstage instance. Let's do that:
-
First open the
/examples/org.yamlfile in your text editor of choice -
At the bottom we'll add the following YAML:
---
apiVersion: backstage.io/v1alpha1
kind: User
metadata:
  name: YOUR GITHUB USERNAME
spec:
memberOf: [guests] -
Now make sure to replace the text "YOUR GITHUB USERNAME" with your actual GitHub User name.
Let's restart Backstage from the terminal once more, by stopping it with Ctrl+C, and starting it with yarn start. You should now be able to log into Backstage and see items in your Catalog.
To learn more about Authentication in Backstage, here are some docs you could read:
Setting up a GitHub Integration
The GitHub integration supports loading catalog entities from GitHub or GitHub Enterprise. Entities can be added to static catalog configuration, registered with the catalog-import plugin, or discovered from a GitHub organization. Users and Groups can also be loaded from an organization. While using GitHub Apps might be the best way to set up integrations, for this tutorial you'll use a Personal Access Token.
Create your Personal Access Token by opening the GitHub token creation page. Use a name to identify this token and put it in the notes field. Choose a number of days for expiration. If you have a hard time picking a number, we suggest to go for 7 days, it's a lucky number.
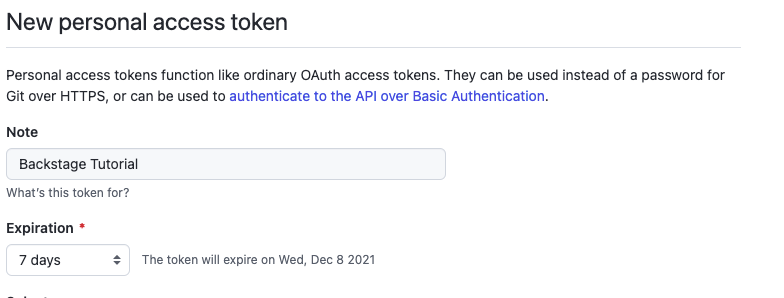
Set the scope to your likings. For this tutorial, selecting repo and workflow is required as the scaffolding job in this guide configures a GitHub actions workflow for the newly created project.
For this tutorial, we will be writing the token to app-config.local.yaml. This file might not exist for you, so if it doesn't go ahead and create it alongside the app-config.yaml at the root of the project. This file should also be excluded in .gitignore, to avoid accidental committing of this file. More details on this file can be found in the Static Configuration documentation.
In your app-config.local.yaml go ahead and add the following:
integrations:
  github:
    - host: github.com
      token: ghp_urtokendeinfewinfiwebfweb # this should be the token from GitHub
That's settled. This information will be leveraged by other plugins.
If you're looking for a more production way to manage this secret, then you can do the following with the token being stored in an environment variable called GITHUB_TOKEN.
integrations:
  github:
    - host: github.com
      token: ${GITHUB_TOKEN} # this will use the environment variable GITHUB_TOKEN
If you've updated the configuration for your integration, it's likely that the backend will need a restart to apply these changes. To do this, stop the running instance in your terminal with Control-C, then start it again with yarn start. Once the backend has restarted, retry the operation.
Some helpful links, for if you want to learn more about: